Flare Data Connector
The Data Connector bridges the gap between different blockchains, enabling the smooth exchange of information and synchronization of smart contracts and state changes. In this guide, you will learn how to:
- Bridge data across blockchains using the Data Connector.
- Understand the working of the CCCR protocol to securely verify and publish cross-blockchain data.
- Attest to a Bitcoin transaction and use the proof on Flare network.
This guide includes code snippets to recreate the process of attesting to a payment on the Bitcoin network and using the proof on the Flare Network. The complete setup and full code are available on the Flare Demo examples repository. You are encouraged to follow along and try it yourself. The repository contains all the necessary code and instructions to set up the environment and run the code.
If you are new to Flare, make sure you first understand the Flare Network.
Starter packs for Hardhat and Foundry are available to help you get started with Flare development.
The Data Connector is a protocol on the Flare Network that enables any smart contract on the network to query non-changing, verifiable information from other blockchains such as Bitcoin or the XRP Ledger (XRPL). The Data Connector provides data in a decentralized and secure manner. This is achieved through a set of independent attestation providers that retrieve the required information from another blockchain and deliver it to the Flare Network. The Data Connector smart contract then verifies if there is sufficient consensus among the received answers and publishes the results.
Transferring external data to Flare
This guide focuses on the Payment attestation type, an attestation type designed to prove and relay data about a transaction that happened on an external chain. You will write a simple script that allows a smart contract deployed on Songbird Testnet Coston to act upon a Bitcoin transaction without a centralized oracle.
For example, suppose you have a transaction on the Bitcoin (BTC) network and want to use this information on Flare, you can achieve this in the following steps:
-
Verifying the transaction. Submit the BTC transaction to a verifier (a service provided by attestation providers or another entity) of your choice. The verifier returns a JSON containing all the information about the transaction and a hex string representing an encoded attestation request to be submitted to the Data Connector smart contract.
-
Make attestation request. Submit the hex-encoded request to the Data Connector smart contract, which emits an event to notify attestation providers about your request.
-
CCCR phases. Wait for all four stages of the overlapped Collect-Choose-Commit-Reveal (CCCR) protocol to finalize.
-
Merkle proof extraction. Once the data is confirmed by the attestation providers and the Data Connector contract reaches a consensus on the final Merkle root, the transaction data can be used on the Flare blockchain. To use the data, you will need the response and Merkle proof, which can be queried from the attestation provider of your choice.
-
Submitting Merkle proof. Submit the response and Merkle proof to your smart contract. The smart contract verifies the proof using a dedicated verification contract that checks the response against the stored Merkle root using the Merkle proof. This verification is available both on the chain and in the Data Connector repository.
Let's understand each of these steps in detail in the following sections.
1. Verifying the transaction
Start by picking your favourite transaction on Blockstream's Bitcoin Testnet explorer.
- The transaction should not be older than two days.
- The transaction should be confirmed by at least 6 blocks.
- Note down the transaction hash.
Data Connector's confirmation requirements are different for each connected blockchain.
Keep in mind that there is a strict separation between testing and production environments. The Data Connector is configured as follows:
- Songbird Canary-Network and Flare Mainnet: Connected to Bitcoin, Dogecoin, and XRP Ledger.
- Songbird Testnet Coston and Flare Testnet Coston2: Connected to Bitcoin Testnet, Dogecoin Testnet, and XRP Ledger Testnet.
On the attestation client side, this typically means a different base URL (e.g., coston.attester.xx vs songbird.attester.xx). Additionally, you need to specify testBTC for the network name instead of BTC because the sourceId (the network name) is included in the transaction encoding.
Now that you have the transaction hash you want to prove, the next step is to construct the encoded version of the data you want to attest. While you can do this manually, the process is complex and requires access to an indexer.
A simpler approach is to use an API provided by verifiers. Any trusted verifier should suffice. You can refer to the full verifier specification on the Verifier server.
To get the encoded request using default verifier implementations, call the ${ATTESTATION_URL}/verifier/btc/Payment/prepareRequest endpoint. Here are the steps to follow:
// Simple hex encoding
function toHex(data) {
  var result = "";
  for (var i = 0; i < data.length; i++) {
    result += data.charCodeAt(i).toString(16);
  }
  return result;
}

const BTC_TRANSACTION_ID =
  "0x" + "01c17d143c03b459707f540fd5ee9f02a730c4cd114f310ef294b706ccf131d1";

async function prepareRequest() {
  const attestationType = toHex("Payment");
  const sourceType = toHex("testBTC");
  // Attestation Request object to be sent to API endpoint
  const requestData = {
    attestationType: attestationType,
    sourceId: sourceType,
    requestBody: {
      transactionId: BTC_TRANSACTION_ID,
      inUtxo: "3",
      utxo: "4",
    },
  };
  const response = await fetch(
    `${ATTESTATION_URL}/verifier/btc/Payment/prepareRequest`,
    {
      method: "POST",
      headers: {
        "X-API-KEY": API_KEY,
        "Content-Type": "application/json",
      },
      body: JSON.stringify(requestData),
    },
  );
  const data = await response.json();
  console.log("Prepared request:", data);
  return data;
}
This code requests attestation for a specific source, testBTC, and attestation type, Payment. Both the type and source are hex-encoded strings, enabling easier extensibility.
The core part of the request is the requestBody. The body structure varies for each attestation type. For the Payment type, the requestBody includes the transaction hash, and both inUtxo and utxo parameters. These parameters provide detailed control over the sender and recipient addresses. The specifics of these parameters are defined by the Payment type definition, which will be covered in a later section.
If the selected verifier successfully finds the transaction, the API will return a response like this:
{
  "status": "VALID",
  "abiEncodedRequest": "0x5061796d656e7400000000000000000000000000000000000000000000000000746573744254430000000000000000000000000000000000000000000000000010594158b4a189785feda815241c4e6f299053a65b22c3d748e9f0a6c34372e501c17d143c03b459707f540fd5ee9f02a730c4cd114f310ef294b706ccf131d100000000000000000000000000000000000000000000000000000000000000080000000000000000000000000000000000000000000000000000000000000004"
}
The status field indicates that the verifier recognized this transaction as valid (it was included in a block within the correct time range). The abiEncodedRequest contains all the data necessary for the attestation clients to include it in the final Merkle root.
This encoded request is what you'll submit to the Data Connector contract. Once submitted, it will be emitted as an event, picked up by attestation clients, verified, and used on the blockchain.
Understanding the structure of abiEncodedRequest.
The structure of abiEncodedRequest may seem complex, but it's essentially a concatenated hex string (with the initial 0x removed) representing different parts of the request. Each part is 32 bytes long (64 characters in hex). Here's a breakdown of the string:
5061796d656e7400000000000000000000000000000000000000000000000000
7465737442544300000000000000000000000000000000000000000000000000
10594158b4a189785feda815241c4e6f299053a65b22c3d748e9f0a6c34372e5
01c17d143c03b459707f540fd5ee9f02a730c4cd114f310ef294b706ccf131d1
0000000000000000000000000000000000000000000000000000000000000008
0000000000000000000000000000000000000000000000000000000000000004
You can decode the first two parts using an online tool like playcode.io.
Breaking it down line-by-line:
-
First line:
toHex("Payment") -
Second line:
toHex("testBTC") -
Third line: Message Integrity Code (MIC). This is a hash of the whole response salted with a string
Flare. It ensures the integrity of the attestation and prevents tampering. -
Remaining lines: These contain the request data, including the transaction hash,
inUtxo, andutxoparameters.
2. Make attestation request
The next step is to request attestation on the Data Connector smart contract, thus broadcasting to the entire network that you want this transaction to be proven. This will be your first interaction with the blockchain and will involve making a transaction. For this, you'll need a small amount of CFLR to cover gas fees. You can obtain testnet CFLR using the CFLR faucet.
Once the attestation is requested you can calculate the roundId - The Data Connector round that was in the collect phase the moment the attestation was requested. You now have to wait for the corresponding Reveal round to end to be able to get the proof. This takes between 3 and 4.5 minutes.
You can get the proof immediately after the Reveal phase ends, but you will not be able to use it until the phase is finalized.
async function submitRequest() {
    const requestData = await prepareRequest();

    const stateConnector = await ethers.getContractAt(
        flareLib.nameToAbi("IStateConnector", "coston").data,
        flareLib.nameToAddress("StateConnector", "coston"),
    );

    // Call to the StateConnector protocol to provide attestation.
    const tx = await stateConnector.requestAttestations(
        requestData.abiEncodedRequest
    );
    const receipt = await tx.wait();

    // Get block number of the block containing contract call
    const blockNumber = receipt.blockNumber;
    const block = await ethers.provider.getBlock(blockNumber);

    // Get constants from Data Connector smart contract
    const BUFFER_TIMESTAMP_OFFSET = Number(await stateConnector.BUFFER_TIMESTAMP_OFFSET());
    const BUFFER_WINDOW = Number(await stateConnector.BUFFER_WINDOW());

    // Calculate roundId
    const roundId = Math.floor(block!.timestamp - BUFFER_TIMESTAMP_OFFSET) / BUFFER_WINDOW);
    // console.log("scRound:", roundId);
    return roundId;
}
3. CCCR phases
-
During the attestation request submission in a fixed
roundIdwithin the CCCR protocol, the system enters the collect phase. In this phase, all attestation providers gather and store attestation requests, a process that spans 90 seconds. -
Following the collect phase is the choose phase, where attestation providers vote on which requests to confirm based on their node states. Upon its conclusion, a consensus is reached among all attestation providers regarding which requests to confirm for the current round.
-
Subsequently, the protocol progresses to the commit phase. At this point, each attestation provider possesses an identical copy of the Merkle tree, containing hashes of responses to attestation requests. During the commit phase, providers submit the hash of the Merkle root, salted with a random number and their address.
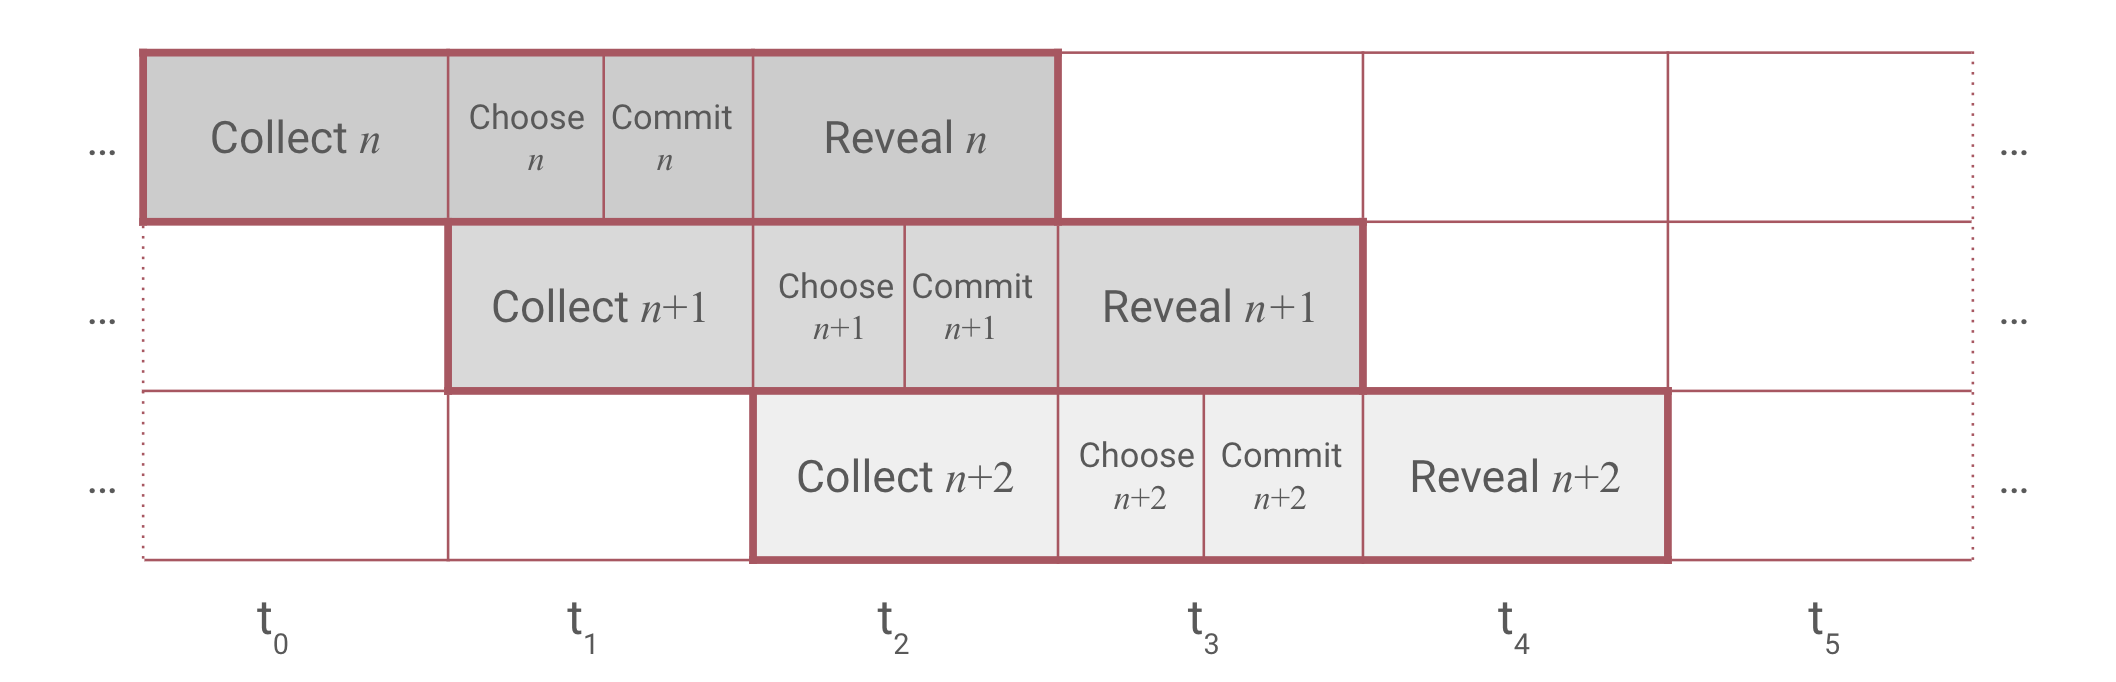
Both the choose and commit phases last 45 seconds, totaling 90 seconds, and coincide with the collect phase of the subsequent round. Finally, the CCCR transitions to the reveal phase, lasting another 90 seconds, during which each provider submits their Merkle root.
CCCR Protocol
Flare's Data Connector protocol operates in attestation rounds, each consisting of five consecutive phases:
-
Collect: Users send their requests to the Data Connector contract, which emits events. Attestation providers gather these requests, assign them to a voting round based on the emission timestamp, and attempt to compile a response.
-
Choose: Attestation providers vote on which requests they can provide valid responses for in the current round.
-
Commit: Attestation providers send transactions committing to the attested data for the round without making the information public, preventing copying.
-
Reveal: Attestation providers disclose the attestation data.
-
Count: The Data Connector contract verifies the revealed attestation data against the committed data. If a majority consensus is reached, the result is published and stored on the blockchain.
During each round, attestation providers create a Merkle tree, with the leaves containing all the attestation responses for requests marked valid in the choose phase. In the reveal phase, only the Merkle root is used as the attestation data. This approach ensures the consensus process remains lightweight and efficient. To act upon an attested request, the end user must provide the response and the Merkle proof demonstrating the inclusion of the response in the Merkle tree.
Upon achieving consensus, the Data Connector smart contract concludes the round by publicizing the final Merkle root, designating it as the attested Merkle root for that specific round.
4. Merkle proof extraction
After the conclusion of the reveal phase, the round in which the attestation has been finalized, and consequently, a Merkle root is now stored within the Data Connector smart contract. As previously explained, this Merkle root serves as the apex of a Merkle tree, encompassing hashes of responses to attestation requests, including the one you aim to validate.
Our next step entails acquiring a Merkle proof—verification that the hash of our transaction indeed resides within the accepted Merkle tree, thereby confirming its acceptance by both the group of attestors and the Data Connector smart contract. The most straightforward approach is to leverage one of the attestation clients, as they possess the complete Merkle tree structure already assembled.
To extract the merkle proof you use the API endpoint:
${ATTESTATION_URL}/attestation-client/api/proof/get-specific-proof
async function testAttestation(scRound, requestData) {
  const attestationProof = {
    roundId: scRound,
    requestBytes: requestData.abiEncodedRequest,
  };
  const response = await fetch(
    `${process.env.ATTESTER_BASE}/attestation-client/api/proof/get-specific-proof`,
    {
      method: "POST",
      headers: {
        "X-API-KEY": process.env.API_KEY,
        "Content-Type": "application/json",
      },
      body: JSON.stringify(attestationProof),
    },
  );

  // Verified attestation proof from verifiers API endpoint.
  const responseData = await response.json();
  console.log("Response", responseData);
}
Utilizing the roundId associated with the data submission from the preceding step, along with the abiEncodedRequest submitted earlier, you can proceed to retrieve the proof. If the attestation client has already constructed the Merkle tree for the corresponding round, obtaining the proof from them involves a straightforward lookup within the tree they submitted for that specific round. This process streamlines the verification, ensuring a swift and efficient confirmation of our transaction's acceptance.
Using the roundId linked to the previous data submission and the abiEncodedRequest provided earlier. If the attestation client has built the Merkle tree for the same round, getting the proof from them is straightforward — it's just a matter of looking it up in the tree they submitted for that round. This makes the verification process quick and simple, ensuring our transaction's acceptance is efficiently confirmed.
The result of the call yields the following JSON, you can review the full specification on the Payment attestation type.
JSON result
{
    "status": "OK",
    "data": {
    "roundId": 791508,
    "hash": "0x893262e158c834e45015f45478e9dccda44f70d73854129666a9fe23e41a4a6a",
    "requestBytes": "0x5061796d656e7400000000000000000000000000000000000000000000000000746573744254430000000000000000000000000000000000000000000000000010594158b4a189785feda815241c4e6f299053a65b22c3d748e9f0a6c34372e501c17d143c03b459707f540fd5ee9f02a730c4cd114f310ef294b706ccf131d100000000000000000000000000000000000000000000000000000000000000080000000000000000000000000000000000000000000000000000000000000004",
    "request": {
    "attestationType": "0x5061796d656e7400000000000000000000000000000000000000000000000000",
    "messageIntegrityCode": "0x10594158b4a189785feda815241c4e6f299053a65b22c3d748e9f0a6c34372e5",
    "requestBody": {
    "inUtxo": "8",
    "transactionId": "0x01c17d143c03b459707f540fd5ee9f02a730c4cd114f310ef294b706ccf131d1",
    "utxo": "4"
},
    "sourceId": "0x7465737442544300000000000000000000000000000000000000000000000000"
},
    "response": {
    "attestationType": "0x5061796d656e7400000000000000000000000000000000000000000000000000",
    "lowestUsedTimestamp": "1707293909",
    "requestBody": {
    "inUtxo": "8",
    "transactionId": "0x01c17d143c03b459707f540fd5ee9f02a730c4cd114f310ef294b706ccf131d1",
    "utxo": "4"
},
    "responseBody": {
    "blockNumber": "2577266",
    "blockTimestamp": "1707293909",
    "intendedReceivedAmount": "11091745",
    "intendedReceivingAddressHash": "0xd4045c296d33c3a727a40d8284b9b3d8fb65c1d8acc21da68143d6d1e4c19b39",
    "intendedSpentAmount": "25800382",
    "oneToOne": false,
    "receivedAmount": "11091745",
    "receivingAddressHash": "0xd4045c296d33c3a727a40d8284b9b3d8fb65c1d8acc21da68143d6d1e4c19b39",
    "sourceAddressHash": "0x477031ede55f3ca387013295a98360bafde1839c4a2f0726e6afdba725055aa7",
    "spentAmount": "25800382",
    "standardPaymentReference": "0x0000000000000000000000000000000000000000000000000000000000000000",
    "status": "0"
},
    "sourceId": "0x7465737442544300000000000000000000000000000000000000000000000000",
    "votingRound": "791508"
},
    "merkleProof": [
    "0x4773a018b7dfcf7390a882406c53fc73eb08f9ebadb637820284dc615b7906cb",
    "0x8ab24c478f9074e6b8f68ad08c6290819ec0e676ec0b6c42a9a3f0e43f510902",
    "0x9f2fac2dbb646f5c9758551744c876a20421340f34dfe09c05877cc4e5540b49"
    ]
}
}
The response data comprises multiple sections, all adhering to a uniform structure across different attestation types.
Firstly, it includes comprehensive details about the request initiated in the previous step, enabling the receiving smart contract to verify the nature of the request made.
Secondly, it encompasses the Merkle proof section, which the verification contract will utilize to ascertain the inclusion of this attestation within the Merkle tree for the specific round (note: the roundId mentioned here will vary in your response). It's worth noting that the proof, despite being short in size (logarithmic in comparison to the number of attestations requested in the round), is pivotal for validation.
Now, let's delve into the specifics of the response body. The entirety of the response, with the proof integrated, corresponds to the Payment.Proof segment within the following Solidity interface:
Payment Solidity Interface
// SPDX-License-Identifier: MIT
pragma solidity >=0.7.6 <0.9;

/**
* @custom:name Payment
* @custom:id 0x01
* @custom:supported BTC, DOGE, XRP, testBTC, testDOGE, testXRP
* @author Flare
* @notice A relay of a transaction on an external chain that is considered a payment in a native currency.
* Various blockchains support different types of native payments.
For each blockchain, it is specified how a payment
* transaction should be formed to be provable by this attestation type.
* The provable payments emulate traditional banking payments from entity A to entity B in native currency with an optional payment reference.
* @custom:verification The transaction with `transactionId` is fetched from the API of the blockchain node or relevant indexer.
* If the transaction cannot be fetched or the transaction is in a block that does not have a sufficient [number of confirmations](/specs/attestations/configs.md#finalityconfirmation), the attestation request is rejected.
*
* Once the transaction is received, the [payment summary](/specs/attestations/external-chains/transactions.md#payment-summary) is computed according to the rules for the source chain.
* If the summary is successfully calculated, the response is assembled from the summary.
* `blockNumber` and `blockTimestamp` are retrieved from the block if they are not included in the transaction data.
* For Bitcoin and Dogecoin, `blockTimestamp` is mediantime of the block.
* For XRPL, `blockTimestamp` is close time of the ledger converted to UNIX time.
*
* If the summary is not successfully calculated, the attestation request is rejected.
* @custom:lut `blockTimestamp`
*/
interface Payment {
/**
 * @notice Toplevel request
 * @param attestationType ID of the attestation type.
 * @param sourceId ID of the data source.
 * @param messageIntegrityCode `MessageIntegrityCode` that is derived from the expected response.
 * @param requestBody Data defining the request.
 Type (struct) and interpretation is determined by the `attestationType`.
 */
struct Request {
bytes32 attestationType;
bytes32 sourceId;
bytes32 messageIntegrityCode;
RequestBody requestBody;

}

/**
 * @notice Toplevel response
 * @param attestationType Extracted from the request.
 * @param sourceId Extracted from the request.
 * @param votingRound The ID of the Data Connector round in which the request was considered.
 * @param lowestUsedTimestamp The lowest timestamp used to generate the response.
 * @param requestBody Extracted from the request.
 * @param responseBody Data defining the response.
 The verification rules for the construction of the response body and the type are defined per specific `attestationType`.
 */
struct Response {
bytes32 attestationType;
bytes32 sourceId;
uint64 votingRound;
uint64 lowestUsedTimestamp;
RequestBody requestBody;
ResponseBody responseBody;

}

/**
 * @notice Toplevel proof
 * @param merkleProof Merkle proof corresponding to the attestation response.
 * @param data Attestation response.
 */
struct Proof {
bytes32[] merkleProof;
Response data;

}

/**
 * @notice Request body for Payment attestation type
 * @param transactionId ID of the payment transaction.
 * @param inUtxo For UTXO chains, this is the index of the transaction input with source address.
 Always 0 for the non-utxo chains.
 * @param utxo For UTXO chains, this is the index of the transaction output with receiving address.
 Always 0 for the non-utxo chains.
 */
struct RequestBody {
bytes32 transactionId;
uint256 inUtxo;
uint256 utxo;

}

/**
 * @notice Response body for Payment attestation type
 * @param blockNumber Number of the block in which the transaction is included.
 * @param blockTimestamp The timestamp of the block in which the transaction is included.
 * @param sourceAddressHash Standard address hash of the source address.
 * @param receivingAddressHash Standard address hash of the receiving address.
 The zero 32-byte string if there is no receivingAddress (if `status` is not success).
 * @param intendedReceivingAddressHash Standard address hash of the intended receiving address.
 Relevant if the transaction is unsuccessful.
 * @param spentAmount Amount in minimal units spent by the source address.
 * @param intendedSpentAmount Amount in minimal units to be spent by the source address.
 Relevant if the transaction status is unsuccessful.
 * @param receivedAmount Amount in minimal units received by the receiving address.
 * @param intendedReceivedAmount Amount in minimal units intended to be received by the receiving address.
 Relevant if the transaction is unsuccessful.
 * @param standardPaymentReference [Standard payment reference](/specs/attestations/external-chains/standardPaymentReference.md) of the transaction.
 * @param oneToOne Indicator whether only one source and one receiver are involved in the transaction.
 * @param status  [Succes status](/specs/attestations/external-chains/transactions.md#transaction-success-status) of the transaction: 0 - success, 1 - failed by sender's fault,x  2 - failed by receiver's fault.
 */
struct ResponseBody {
uint64 blockNumber;
uint64 blockTimestamp;
bytes32 sourceAddressHash;
bytes32 receivingAddressHash;
bytes32 intendedReceivingAddressHash;
int256 spentAmount;
int256 intendedSpentAmount;
int256 receivedAmount;
int256 intendedReceivedAmount;
bytes32 standardPaymentReference;
bool oneToOne;
uint8 status;

}
}
Let's thoroughly examine the ResponseBody section of the response, as it forms the core of the entire attestation process to be utilized on the Flare chain. Imagine a scenario where you aim to ensure that someone has made a payment to us on the Bitcoin network and utilized that payment to mint an NFT on Flare. In such a case, you would meticulously verify several aspects: whether the payment amount is sufficient, if the payment has been accepted, whether it was directed to the correct address, and more.
This is precisely what the ResponseBody encapsulates. Let's delve deeper into its contents.
-
blockNumber: This denotes the block number on the underlying chain where the transaction was included. While not directly relevant for all scenarios, it can be crucial for certain applications where transaction sequencing is significant. -
blockTimestamp: This represents the timestamp of the block on the underlying chain in which the transaction was included. This timestamp holds significance, particularly if you need to ensure that the transaction occurred within a specific timeframe, such as when minting an NFT where timely payment is essential. -
sourceAddressHash: This is the hash of the address that initiated the payment. It's hashed to ensure compatibility across different blockchain formats and lengths. Notably, for UTXO-based chains like BTC and DOGE, where multiple addresses may be involved, this hash represents the selected payee address specified by theutxofield in the request. -
receivingAddressHash: Similar tosourceAddressHash, this is the hash of the address that received the payment. In UTXO-based chains, it corresponds to the selected receiver address specified by theinUtxofield in the request. -
intendedReceivingAddressHash: This hash indicates the address intended to receive the payment. It becomes relevant if the transaction was unsuccessful, such as in the case of reverted payments, primarily applicable to XRPL transactions. -
spentAmount: This denotes the amount spent by the sender, encompassing all inputs controlled by the sender's address specified in theinUtxofield. -
intendedSpentAmount: Similar tointendedReceivingAddressHash, this field represents the intended amount to be spent by the sender, relevant in the case of unsuccessful transactions. -
receivedAmount: This indicates the amount received by the receiver, specifically the amount received by the address specified in theutxofield. -
intendedReceivedAmount: Similar tointendedSpentAmount, this field represents the intended amount to be received by the receiver, pertinent in the case of unsuccessful transactions. -
standardPaymentReference: This is a 32-byte string serving as a standard payment reference for the transaction, allowing encoding of additional payment information, such as invoice or order numbers. It's crucial to refer to the full payment reference specification for comprehensive understanding. Full specification. -
oneToOne: A boolean flag indicating whether the transaction was one-to-one, meaning all inputs were controlled by the same sender address, and outputs solely comprised UTXOs linked to the receiving address. -
status: An integer denoting the transaction status: 0 for successful transactions, 1 for unsuccessful transactions due to sender fault, and 2 for unsuccessful transactions due to receiver fault (specifically applicable to XRPL transactions). Full specification.
The transaction hash is not explicitly included in the ResponseBody as it's part of the request body to avoid redundancy. However, it's incorporated into the Merkle proof. For onchain usage, ensuring the uniqueness of the proof (e.g., by checking that the transaction hash hasn't been used before) can prevent double spending unless the sender differs.
Type structure
Let's explore the Payment interface in detail. Each attestation type, including any you encounter in the future, follows a similar structure, making it crucial to grasp its components.
-
Request: This part defines the structure of the request, comprising fields likeattestationType,sourceId,messageIntegrityCode, andrequestBody. While the first three fields remain consistent across all attestation types,requestBodyvaries based on the type. In our case, the request body includes the initially requested data - the transaction hash and utxo indices. Interestingly, the unpacking of the request made to the data connector mirrors the ABI-encoded version of therequestBodywithin theRequeststructure. This standardization aids attestation providers in unpacking the request effortlessly. -
Response: This section outlines the complete response structure. The first four fields are standardized across all attestation types, whileresponseBodyis specific to each type. The initial fields identify the attestation request and chain.votingRoundhelps determine the round in which the request was submitted, crucial for obtaining the correct Merkle root for proof validation.lowestUsedTimestampdenotes the lowest timestamp utilized to generate the response. -
Proof: This component encapsulates the complete structure passed around, including theResponse(which, in turn, contains theRequest). Additionally, it includes themerkleProof, a collection of Merkle hashes validating the inclusion of the response in the Merkle tree specified by thevotingRoundin theResponse. -
RequestBody: This defines the structure of the request body, specific to the attestation type, containing data used to construct the response. While it can be as intricate as necessary, it's essential to maintain simplicity to ease processing and reduce complexity. -
ResponseBody: This part outlines the structure of the response body, unique to each attestation type and containing data intended for onchain use. It can be as complex as required, allowing for the inclusion of lists, nested structures, etc. However, simplicity is key to facilitate efficient processing, as nested structures can be challenging and resource-intensive to work with.
5. Submitting Merkle proof
In the typical interaction with a contract on the Flare chain, there are two main aspects:
-
Validation of Relay Information: The contract needs to verify that the relayed information contains sufficient details to execute the intended action. For instance, it might need to confirm that the payment amount is adequate to mint an NFT. As discussed earlier, the necessary information for this validation is provided by the Data Connector.
-
Verification of Relay Authenticity: Once the relayed information is deemed sufficient, the contract must verify its authenticity by confirming that it was indeed relayed by the Data Connector and that the accompanying Merkle proof is valid. This verification is performed by submitting the Merkle proof to the verification contract. This contract, which will be explored further in the next section, acts as a wrapper around OpenZeppelin's Merkle proof verification contract. To ascertain whether the round in which the request was submitted has been finalized, one can check the
lastFinalizedRoundIdmethod on the Data Connector smart contract. The finalization occurs after the reveal phase of the round has ended, signifying the completion of the round's processing. The verification process typically commences with the first request to the Data Connector smart contract following the conclusion of the reveal phase.
Regarding the Verifier contract, it's essentially a straightforward wrapper around OpenZeppelin's Merkle proof verification contract. While the code for these verifier contracts can be found in the verification subfolder, they've been deployed on the Songbird Testnet Coston for ease of use and are already included in the Periphery Library Unofficial Contract Registry.
The verifier interface resembles the payment interface already discussed, with similar components and structures.
// SPDX-License-Identifier: MIT
pragma solidity >=0.7.6 <0.9;

import "../../../interface/types/Payment.sol";

interface IPaymentVerification {
    function verifyPayment(Payment.Proof calldata _proof) external view returns (bool _proved);
}
The verifyPayment function accepts the Payment.Proof structure as its argument and returns a boolean value indicating whether the provided proof is correct.
Essentially, the contract serves as a wrapper that retrieves the Merkle root from the Data Connector contract and verifies the proof against it. This process ensures the authenticity and integrity of the relayed payment information.
// SPDX-License-Identifier: MIT
pragma solidity 0.8.20;

import "../../interface/types/Payment.sol";
import "../../interface/external/IMerkleRootStorage.sol";
import "./interface/IPaymentVerification.sol";
import {MerkleProof} from "@openzeppelin/contracts/utils/cryptography/MerkleProof.sol";

contract PaymentVerification is IPaymentVerification {
   using MerkleProof for bytes32[];

   IMerkleRootStorage public immutable merkleRootStorage;

   constructor(IMerkleRootStorage _merkleRootStorage) {
      merkleRootStorage = _merkleRootStorage;
   }

   function verifyPayment(
      Payment.Proof calldata _proof
   ) external view returns (bool _proved) {
      return _proof.data.attestationType == bytes32("Payment") &&
         _proof.merkleProof.verify(
            merkleRootStorage.merkleRoot(_proof.data.votingRound),
            keccak256(abi.encode(_proof.data))
         );
   }
}
Onchain verification
The onchain verification process is equally straightforward. You simply ask the verifier, just as you did offchain. Verification doesn't incur any costs to verify the proof onchain, apart from minimal gas expenses.
Solidity code to verify proof onchain and keep track of total transaction values.
// SPDX-License-Identifier: MIT

import {IPaymentVerification} from "@flarenetwork/flare-periphery-contracts/coston/stateConnector/interface/IPaymentVerification.sol";
import {Payment} from "@flarenetwork/flare-periphery-contracts/coston/stateConnector/interface/Payment.sol";
import {FlareContractsRegistryLibrary} from "@flarenetwork/flare-periphery-contracts/coston/util-contracts/ContractRegistryLibrary.sol";

pragma solidity ^0.8.20;

contract PaymentAggregationExample {
mapping(bytes32 => uint256) public totalReceived;
mapping(bytes32 => mapping(bytes32 => bool)) public transactionProcessed;

Payment.Proof[] public processedPayments;

function isPaymentValid(
Payment.Proof calldata payment
) public view returns (bool) {
// Use the library to get the verifier contract and verify that is
return
FlareContractsRegistryLibrary
.auxiliaryGetIPaymentVerification()
.verifyPayment(payment);

}

function addPayment(Payment.Proof calldata payment) public {
// Check with data connector
require(
isPaymentValid(payment),
"Payment is not confirmed by the Data Connector"
);

// Additional dApp dependent checks

// We only accept testBTC payments
require(
payment.data.sourceId ==
0x7465737442544300000000000000000000000000000000000000000000000000,
"Payment made on incorrect chain"
);

// We don't want to double count payments
require(
transactionProcessed[
payment.data.responseBody.receivingAddressHash
][payment.data.requestBody.transactionId] == false,
"Payment already processed"
);
transactionProcessed[payment.data.responseBody.receivingAddressHash][
payment.data.requestBody.transactionId
] = true;

if (payment.data.responseBody.receivedAmount > 0) {
totalReceived[
payment.data.responseBody.receivingAddressHash
] += uint256(payment.data.responseBody.receivedAmount);

}

processedPayments.push(payment);

}
}
Let's break down the key functions:
-
isPaymentValid: This view function verifies if the provided payment is valid by checking if it's included in the Data Connector. We utilize the Flare-provided PaymentVerification contract in conjunction with the periphery library to directly access the verifier contract. The function is straightforward—we call theverifyPaymentmethod on the verifier contract. Remember, this is a view function, so there are no costs associated with checking the proof on the chain. -
addPayment: This function is called by users to add payments to the contract. Remember, using the Data Connector on the chain typically involves a two-step process. Firstly, you validate the proof and data using the verifier contract, ensuring that the provided payment is valid. Then, you verify that the provided data meets our specific use case—such as being a payment intestBTC. Once you are certain of the payment's validity, you can tally the total received amount and store the proof for future reference.
Offchain verification
You can first check the proof offchain (recall that verification is just a view method) and then create a simple contract that will store the verifications and verify them onchain.
export async function checkMerkleProof(scRound: number) {
  // Check that the round is already finalized
  const stateConnector = await ethers.getContractAt(
    flareLib.nameToAbi("IStateConnector", "coston").data,
    flareLib.nameToAddress("StateConnector", "coston"),
  );

  const lastFinalized = await stateConnector.lastFinalizedRoundId();

  if (scRound > lastFinalized) {
    console.log("scRound:", scRound, "is not finalized yet");
    return;
  }

  const response = await requestMerkleProof(scRound);

  const paymentVerifier = await ethers.getContractAt(
    flareLib.nameToAbi("IPaymentVerification", "coston").data,
    flareLib.nameToAddress("IPaymentVerification", "coston"),
  );
  const payment = {
    data: response.data.response,
    merkleProof: response.data.merkleProof,
  };

  const tx = await paymentVerifier.verifyPayment(payment);
  console.log("Verification tx:", tx);
  return payment;
}
Running this you should result in:
Verification tx: true
Hooray! This means that the verifier has accepted your Merkle proof and concluded the entire process.
Conclusion
In the broader scope of a comprehensive application, this pipeline would integrate and execute whenever your decentralized application requires data from an external blockchain. By employing an innovative approach, utilizing independent attestation providers and the overlapped CCCR protocol, the Data Connector ensures decentralized and secure access to data.
This guide has offered an in-depth exploration of attestation rounds, the Merkle tree structure, and practical implementation of the Data Connector for transaction verification on external chains. With its effective data bridging capabilities, the Data Connector is poised to redefine decentralized collaboration by enabling trustless interactions among diverse blockchain networks.
For those interested in exploring further, the entire codebase is available on flare-demo-examples, where additional examples and helpful scripts are provided for running the setup independently. Feel free to dive in and explore!
Obtain response data without proof.
There are scenarios where you may simply need the response data without the accompanying proof or any Data Connector confirmation procedure details. This could be useful for debugging or verifying the data obtained from the Data Connector.
To obtain only the response data, without the proof, you can query the prepareResponse endpoint with the same data as you would for prepareRequest. In doing so, you'll receive solely the response part. This enables you to verify locally whether the response is correct and aligns with what you intend to have proven.
async function getPreparedResponse() {
const attestationType = toHex("Payment");
const sourceType = toHex("testBTC");
// Attestation Request object to be sent to API endpoint
const requestData = {
attestationType: attestationType,
sourceId: sourceType,
requestBody: {
transactionId: BTC_TRANSACTION_ID,
inUtxo: "8",
utxo: "4",

},
};

const response = await fetch(
`${ATTESTATION_URL}/verifier/btc/Payment/prepareResponse`,

{
method: "POST",
headers: {
"X-API-KEY": ATTESTATION_API_KEY as string,
"Content-Type": "application/json",
},
body: JSON.stringify(requestData),
},
);
const data = await response.json();
console.log("Prepared response:", data);
return data;
}
When you query the prepareResponse endpoint, you receive only the response part. You can then compare this response directly with the one you used in your contract interactions to ensure they match.
{
    "status": "VALID",
    "response": {
    "attestationType": "0x5061796d656e7400000000000000000000000000000000000000000000000000",
    "lowestUsedTimestamp": "1707293909",
    "requestBody": {
    "inUtxo": "8",
    "transactionId": "0x01c17d143c03b459707f540fd5ee9f02a730c4cd114f310ef294b706ccf131d1",
    "utxo": "4"
},
    "responseBody": {
    "blockNumber": "2577266",
    "blockTimestamp": "1707293909",
    "intendedReceivedAmount": "11091745",
    "intendedReceivingAddressHash": "0xd4045c296d33c3a727a40d8284b9b3d8fb65c1d8acc21da68143d6d1e4c19b39",
    "intendedSpentAmount": "25800382",
    "oneToOne": false,
    "receivedAmount": "11091745",
    "receivingAddressHash": "0xd4045c296d33c3a727a40d8284b9b3d8fb65c1d8acc21da68143d6d1e4c19b39",
    "sourceAddressHash": "0x477031ede55f3ca387013295a98360bafde1839c4a2f0726e6afdba725055aa7",
    "spentAmount": "25800382",
    "standardPaymentReference": "0x0000000000000000000000000000000000000000000000000000000000000000",
    "status": "0"
}
}
}
Automations for XRPL, Bitcoin and Dogecoin.
Let's automate this process and create a script, that creates a transaction on external chain and immediately try to see what request you would get from the data connector.
XRP Ledger
In the tryXRPLTransactionVerification.ts file, a script initiates an XRPL transaction to a predefined address. Upon running the script after populating the .env file with an XRPL_PRIVATE_KEY containing testnet XRP (Faucet), the transaction is executed.
Subsequently, you can immediately examine the request you would receive from the data connector. The script is straightforward, with the critical aspect being the proper encoding and padding of the standard payment reference to 32 bytes. If the standard payment reference adheres to the specification, it will also be included in the response from the Data Connector.
An example result of this process:
See transaction at https://testnet.xrpl.org/transactions/1D3FC0F8A2E509F2C4EC2F2F446075A60674C7C7EFE04948632444088FF54B42
{
    status: 'VALID',
    response: {
    attestationType: '0x5061796d656e7400000000000000000000000000000000000000000000000000',
    sourceId: '0x7465737458525000000000000000000000000000000000000000000000000000',
    votingRound: '0',
    lowestUsedTimestamp: '1708820060',
    requestBody: {
    transactionId: '0x1D3FC0F8A2E509F2C4EC2F2F446075A60674C7C7EFE04948632444088FF54B42',
    inUtxo: '0',
    utxo: '0'
},
    responseBody: {
    blockNumber: '45677518',
    blockTimestamp: '1708820060',
    sourceAddressHash: '0xa1ca3089c3e9f4c6e9ccf2bfb65bcf3e9d7544a092c79d642d5d34a54e0267e1',
    receivingAddressHash: '0x0555194538763da400394fc7184432e9a006565fa710392ea1a86486eb83920f',
    intendedReceivingAddressHash: '0x0555194538763da400394fc7184432e9a006565fa710392ea1a86486eb83920f',
    standardPaymentReference: '0x48656C6C6F20776F726C64210000000000000000000000000000000000000000',
    spentAmount: '22',
    intendedSpentAmount: '22',
    receivedAmount: '10',
    intendedReceivedAmount: '10',
    oneToOne: true,
    status: '0'
}
}
}
Hello world!
Bitcoin (and Dogecoin)
The process is analogous: create a basic transaction with an OP_RETURN containing the payment reference. However, due to security considerations, you can't immediately verify the response as you do with XRPL transactions. Bitcoin requires 6 confirmations, and Dogecoin requires 60, typically taking just under an hour.
As a result, the script solely generates the transaction and prints the transaction hash. Alternatively, it can use a provided transaction hash to query the response from the Data Connector.
References
- Flare Hardhat and Foundry starter packs.
- Demo repository for this guide.
- Data Connector specification.
- Data Connector deployment on Songbird Testnet Coston.