# GCP Marketplace Nodes
> Pre-configured blockchain nodes in GCP marketplace
> For the complete documentation index, see [llms.txt](/llms.txt). Markdown versions of documentation pages are available by appending `.md` to the page URL.
Source: https://dev.flare.network/run-node/gcp-marketplace-nodes
Deploy blockchain nodes without the need to install dependencies or manage configuration files. The nodes come with a copy of the databases locally which drastically reduces bootstrap times. The machine images are available for Flare Mainnet, Flare Testnet Coston2, Songbird Canary-Network, Songbird Testnet Coston and several other networks.
Head to [Google Cloud Marketplace](https://console.cloud.google.com/marketplace/product/flare-public/blockchain-machine-image-flare-network) to get started.
## Supported blockchain nodes[](#supported-blockchain-nodes "Direct link to Supported blockchain nodes")
Name
Config Dir
Machine Type
vCPUs
RAM
Disk Size
Disk Type
Flare Mainnet
`/etc/flare`
n2d-standard-4
4
16 GB
830 GB
Balanced
Flare Mainnet Rosetta
`/etc/flare_rosetta`
n2d-standard-4
4
16 GB
830 GB
Balanced
Flare Testnet Coston2
`/etc/coston2`
n2d-standard-4
4
16 GB
280 GB
Balanced
Flare Testnet Coston2 Rosetta
`/etc/coston2_rosetta`
n2d-standard-4
4
16 GB
280 GB
Balanced
Songbird Canary-Network
`/etc/songbird`
n2d-standard-8
8
32 GB
2,730 GB
Balanced
Songbird Testnet Coston
`/etc/coston`
n2d-standard-4
4
16 GB
280 GB
Balanced
Other supported networks
Other supported networks
Name
Config Dir
Machine Type
vCPUs
RAM
Disk Size
Disk Type
Algorand
`/etc/algorand`
e2-custom-8-13056
8
13 GB
70 GB
Balanced
Avalanche
`/etc/avalanche`
e2-custom-8-16384
8
16 GB
530 GB
Balanced
Bitcoin
`/etc/bitcoin`
e2-custom-2-16128
2
16 GB
1,030 GB
Balanced
Binance Smart Chain
`/etc/bsc`
c2-standard-8
8
32 GB
2,030 GB
SSD
Cosmos Hub
`/etc/cosmos`
n2d-standard-4
4
16 GB
1,030 GB
Balanced
Dogecoin
`/etc/dogecoin`
e2-custom-2-11008
2
11 GB
380 GB
Balanced
Ethereum
`/etc/ethereum`
n2d-standard-8
8
32 GB
2,230 GB
Balanced
Ethereum Holesky
`/etc/ethereum`
n2d-standard-8
8
32 GB
430 GB
Balanced
Ethereum Sepolia
`/etc/ethereum`
n2d-standard-8
8
32 GB
730 GB
Balanced
Filecoin Lotus
`/etc/filecoin`
e2-custom-16-32768
16
32 GB
1,030 GB
SSD
Litecoin
`/etc/litecoin`
e2-custom-2-11520
2
12 GB
330 GB
Balanced
Polygon
`/etc/polygon`
n2d-standard-16
16
64 GB
6,030 GB
SSD
XRPL
`/etc/xrpl`
n2d-standard-8
8
32 GB
375 GB
Local SSD
## Prerequisites[](#prerequisites "Direct link to Prerequisites")
Ensure you have:
- A Google Cloud account
- A service account with at least the following permissions (it can be created beforehand or during the launch process using GUI):
- **roles/config.agent**
- **roles/compute.admin**
- **roles/iam.serviceAccountUser**
- Verify that your [Quotas and System Limits](https://docs.cloud.google.com/docs/quotas/view-manage), located in **IAM and admin > Quotas and system limits**, meet the resource requirements for the blockchain node you intend to deploy. Refer to the [Supported blockchain nodes](#supported-blockchain-nodes) table for the specific resource requirements of each node. Adjust your quotas as needed to ensure sufficient resources are available.
## Setup a node[](#setup-a-node "Direct link to Setup a node")
1. **Locate and launch the blockchain machine image**
Head to the [Google Cloud Marketplace](https://console.cloud.google.com/marketplace/product/flare-public/blockchain-machine-image-flare-network).
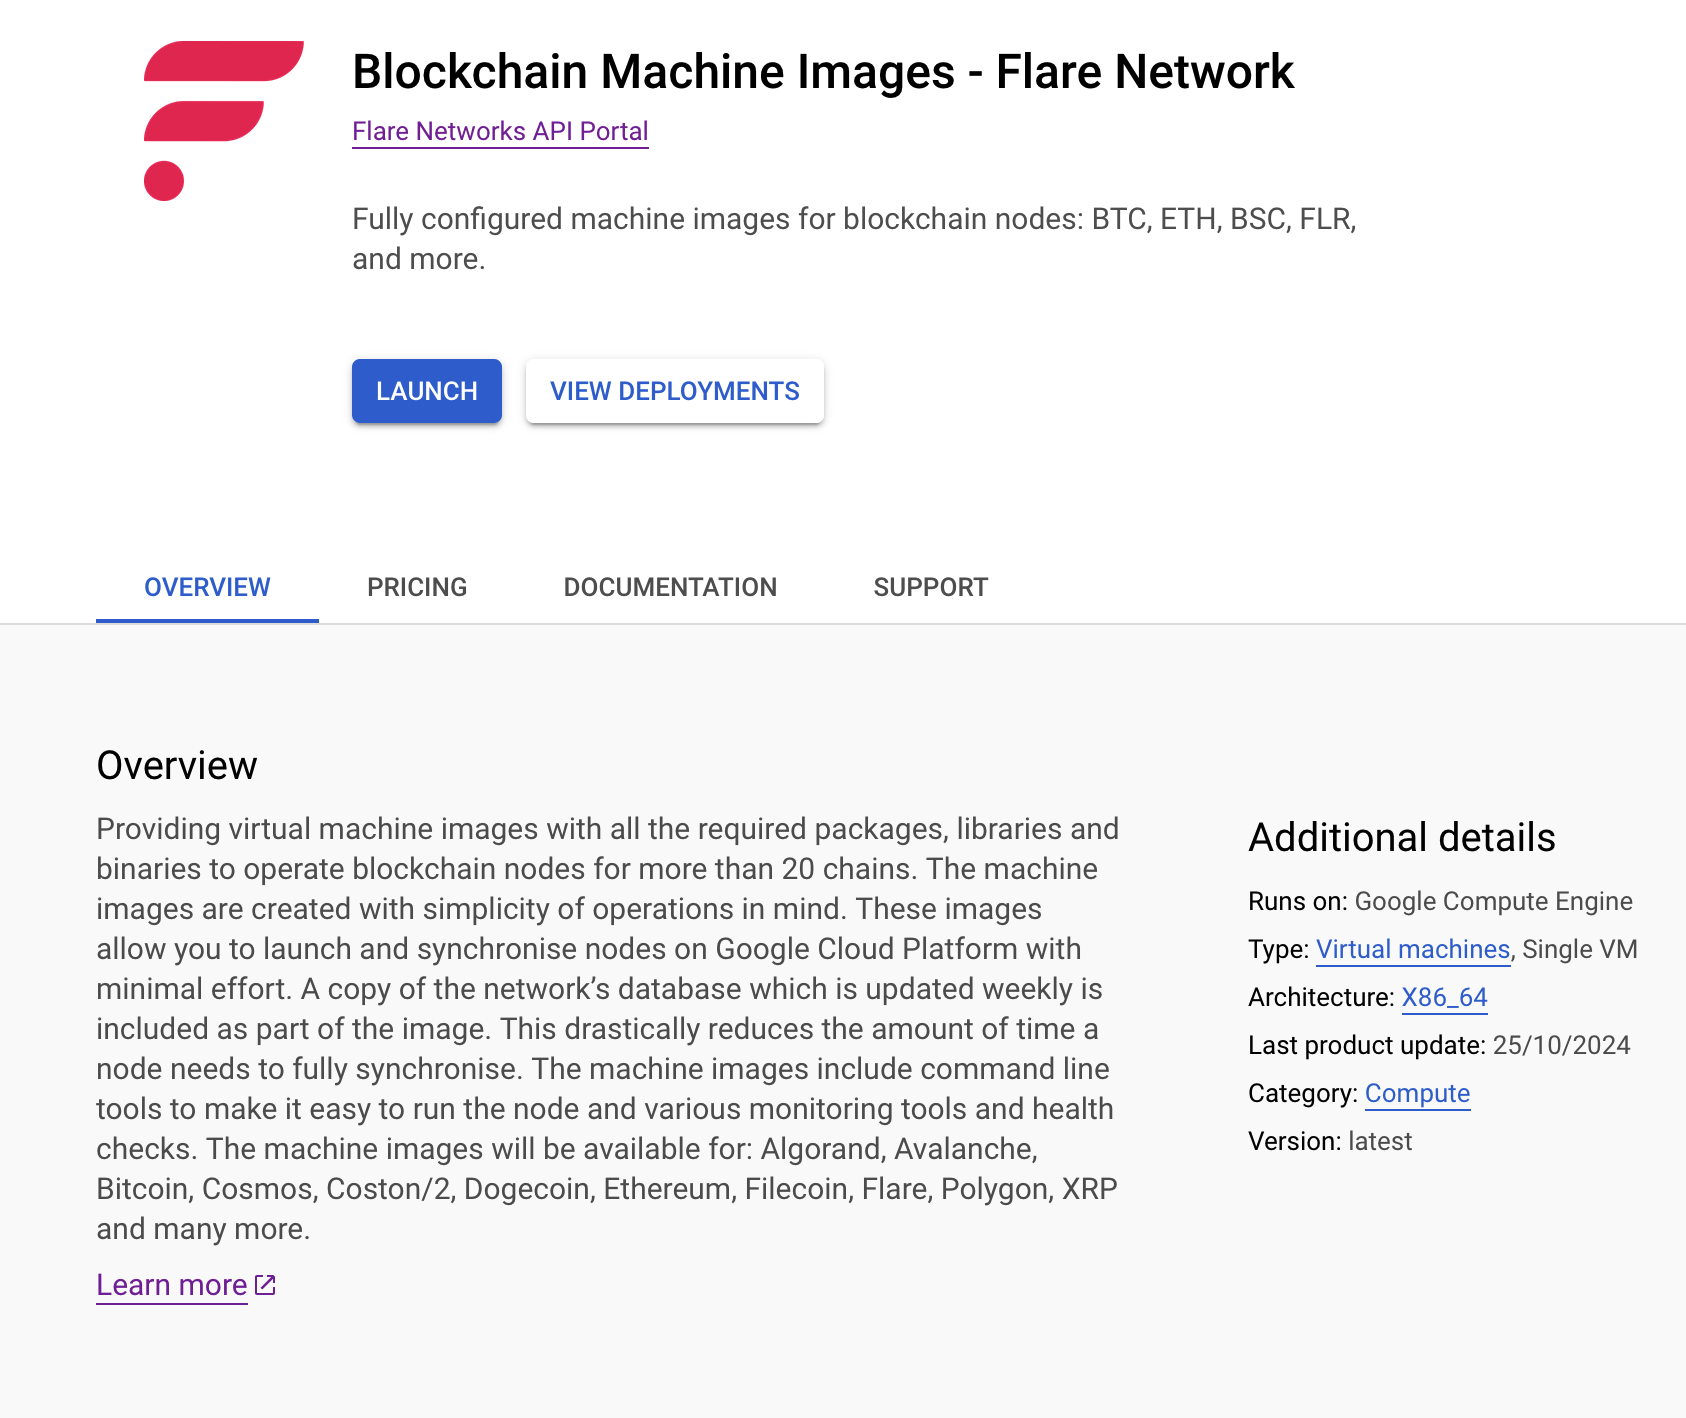
Click the **Launch** button to proceed.
2. **Configure basic settings**
Choose the service account, source image, and region for your instance. To use an existing service account, click the **Existing account** button.
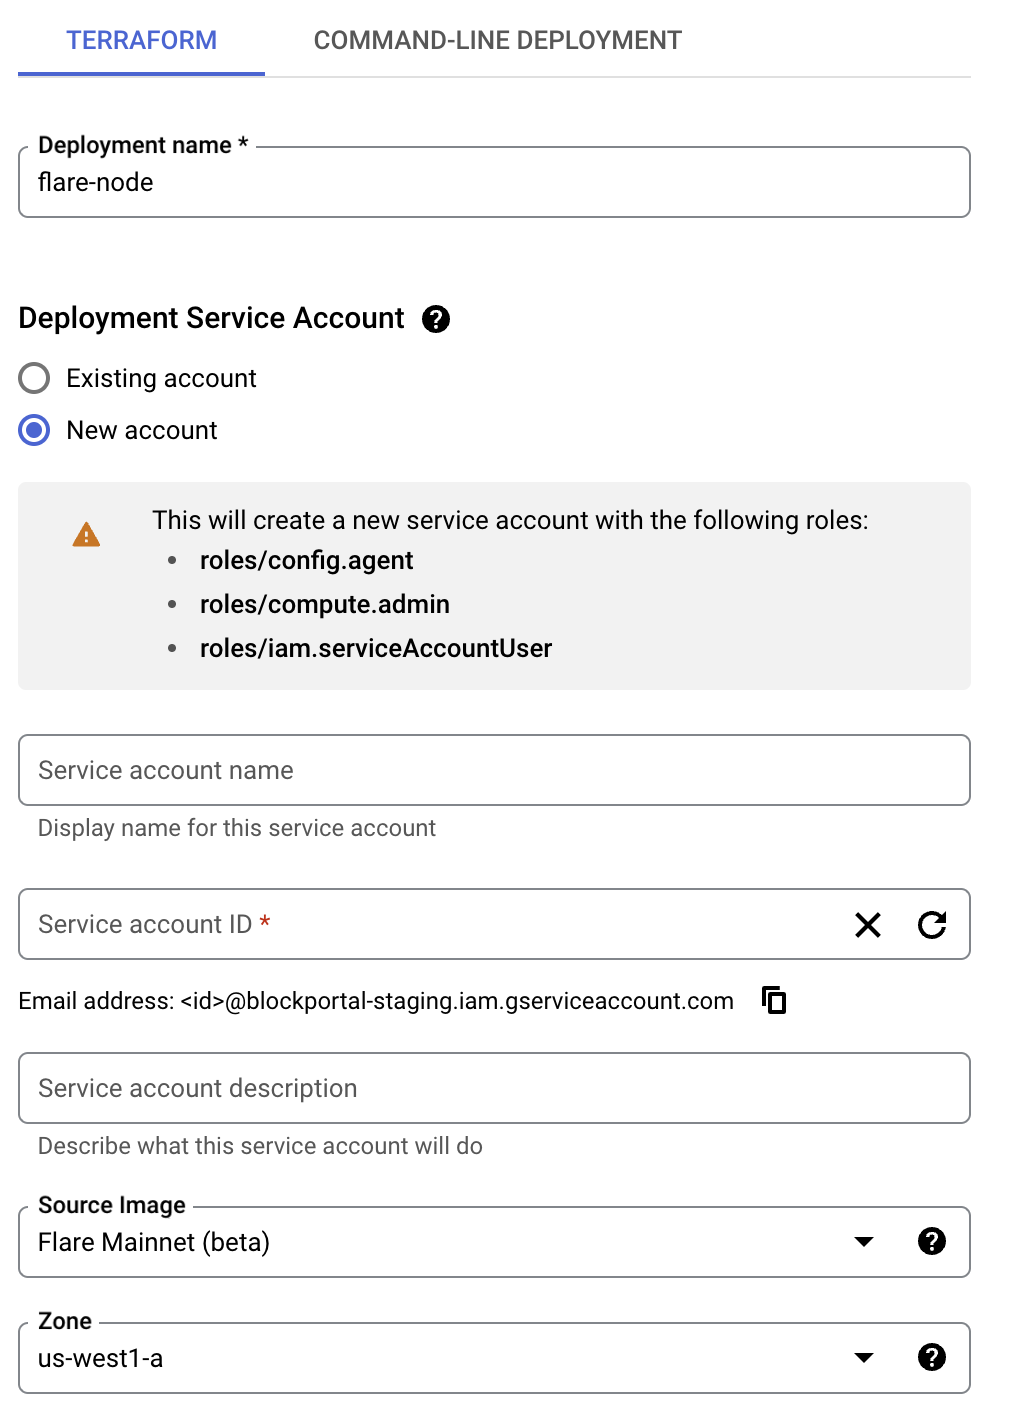
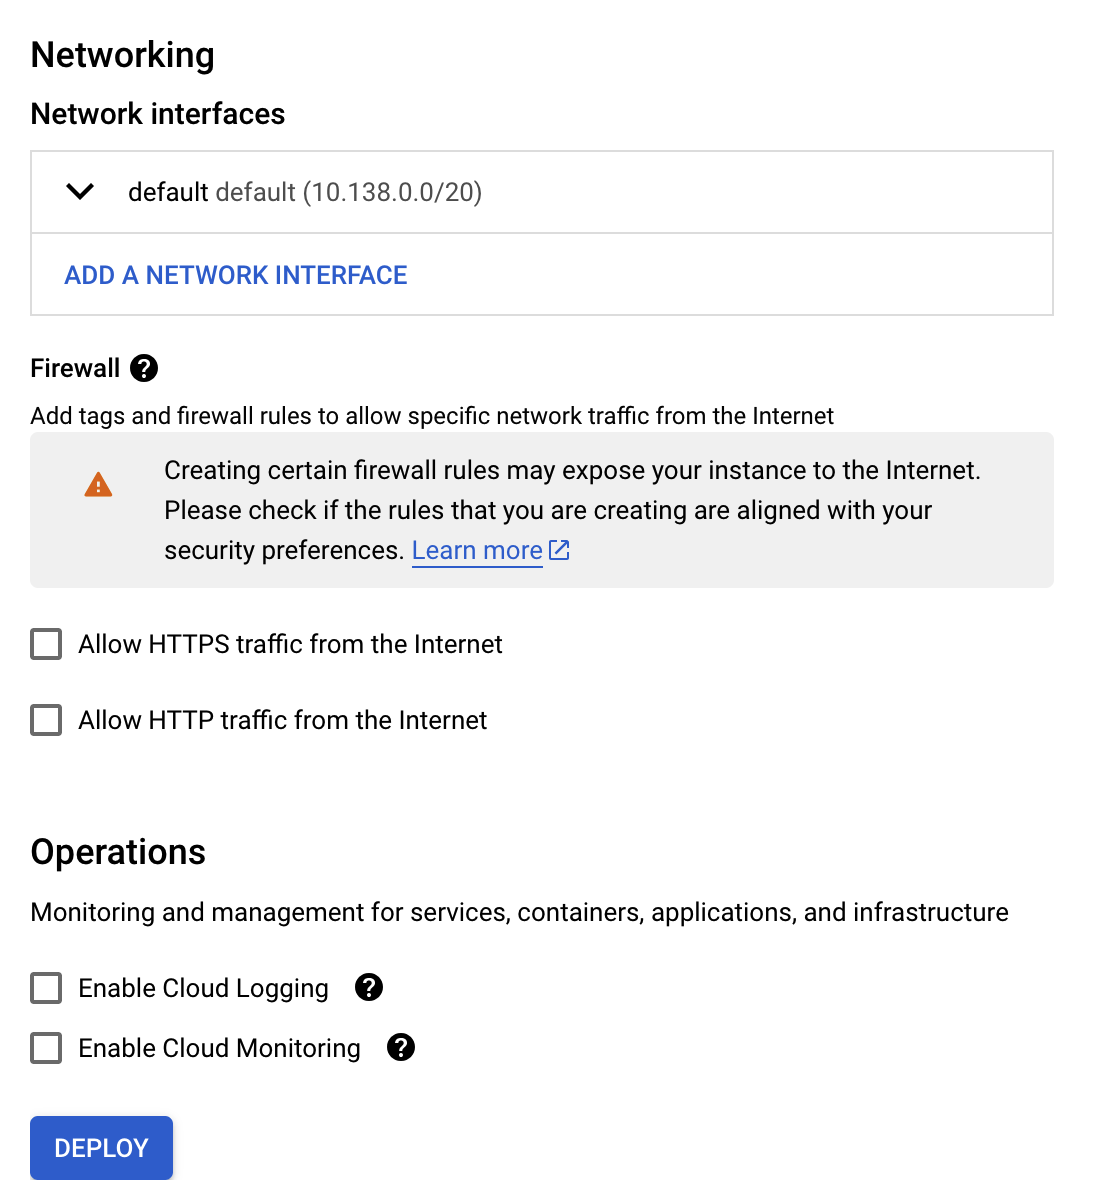
Next, select the network where the node will be deployed, and configure basic firewall rules. Once done, click **Deploy**. This will launch a node with the deployment name, for example `flare-node`, in the **Compute Engine > VM instances**.
3. **Troubleshooting**
If you encounter any issues during the deployment process, refer to the [Troubleshooting Section](#troubleshooting) for guidance.
## Connect to the node[](#connect-to-the-node "Direct link to Connect to the node")
Node operations are managed using the `nodectl` CLI tool.
```
sudo nodectl help
```
Configuration files are located in the `/etc/` directory. For instance, Flare nodes will have their configurations in `/etc/flare`.
To start the node, connect to the instance and apply the services using:
```
# Applies all services configured in `/etc//config.yaml`sudo nodectl apply --target all
```
## Verify node operation[](#verify-node-operation "Direct link to Verify node operation")
The quickest way to verify that the node is running is by using the built-in health checks. Logs can also be accessed in the `/var/log/` directory, for example, `/var/log/flare`.
```
# Run health checkssudo nodectl health# Display detailed node informationsudo nodectl status
```
For live log monitoring, use `nodectl`:
```
sudo nodectl logs -f
```
For more log options, refer to the `journalctl` manual:
```
man journalctl
```
## Advanced Deployment with Terraform[](#advanced-deployment-with-terraform "Direct link to Advanced Deployment with Terraform")
Blockchain machine images can also be deployed using Terraform to meet advanced requirements, such as replicating nodes, automating configuration, and scaling.
In this section, we provide an example which deploys two replicas of Flare nodes in the EU and US regions. Source code is available in the [flare-foundation/bmi-terraform-examples](https://github.com/flare-foundation/bmi-terraform-examples) repository.
The first step is to obtain the latest blockchain machine image. Start by navigating to the [Google Cloud Marketplace](https://console.cloud.google.com/marketplace/product/flare-public/blockchain-machine-image-flare-network) and click `LAUNCH`. Then, switch to the `COMMAND-LINE DEPLOYMENT` tab and scroll down to the VM Image section, where you will find a table containing the latest images. Copy the name of the latest image and update the locals in the `instance.tf` file accordingly. Additionally, ensure that all required variables are correctly set in the `terraform.tfvars`, such as GCP project name, before proceeding.
```
locals { replicas = { 1 = { # update here image = "projects/mpi-flare-public/global/images/flare---v1-..." zone = "europe-west1-c" }, 2 = { # update here image = "projects/mpi-flare-public/global/images/flare---v1-..." zone = "us-west1-a" } }}
```
Next, configure a firewall rule to allow external traffic from other peers in the network to access port `9651`.
```
resource "google_compute_firewall" "peering" { project = var.gcp_project_name name = "flare-example-peering-tcp" network = "default" allow { protocol = "tcp" ports = ["9651"] } source_ranges = ["0.0.0.0/0"] target_tags = ["flare-example-peering"] priority = "600"}
```
Optionally, you can create a service account with the necessary permissions to access a Slack webhook stored in GCP Secret Manager. The node uses the secret's name to obtain the webhook and sends health alerts to Slack.
Each instance must define both startup and shutdown scripts. The startup script handles node configuration tasks, such as enabling Promtail log scraping, node metrics, and Slack alerts. Use tools such as `jq`, `yq` and `sed` to perform the configuration.
```
#!/bin/bash#### Configure node ##### Exampleyq eval '.health_checks.slack_alerts.webhook_secret_name = "example_slack_webhook_secret_name"' -i /etc/flare/config.yamlyq eval '.health_checks.slack_alerts.enabled = true' -i /etc/flare/config.yaml#### Start node ####nodectl apply --target all
```
The shutdown script ensures the node shuts down gracefully.
```
#!/bin/bashnodectl stop
```
Finally, all the previously mentioned files and resources are used to define instance resources, which tie together the configuration, scripts, replication and permissions necessary for the node deployment.
```
resource "google_compute_instance" "this" { for_each = local.replicas project = var.gcp_project_name name = "flare-node-example-replica-${each.key}" zone = each.value.zone machine_type = "n2d-standard-4" metadata = { startup-script = templatefile("${path.module}/templates/startup.sh", {}) shutdown-script = templatefile("${path.module}/templates/shutdown.sh", {}) } boot_disk { initialize_params { image = each.value.image type = "pd-balanced" } } network_interface { network = "default" access_config { // Ephemeral public IP } } tags = google_compute_firewall.peering.target_tags service_account { email = google_service_account.this.email scopes = ["cloud-platform"] }}
```
## Troubleshooting[](#troubleshooting "Direct link to Troubleshooting")
- **Deployment via UI failure due to Terraform state lock**
- **Symptom**: The deployment fails, and clicking **Retry** leads to Terraform state lock errors.
- **Solution**: Instead of retrying, delete the failed deployment and start a new one.
- **Deployment failure due to exceeded quotas**
- **Symptom**: The deployment fails, displaying an error message in the logs similar to:
```
Error: Error waiting for instance to create: Quota 'SSD_TOTAL_GB' exceeded. Limit: 500.0 in region us-west1.metric name = compute.googleapis.com/ssd_total_storagelimit name = SSD-TOTAL-GB-per-project-regionlimit = 500dimensions = map[region:us-west1]
```
- **Solution**: Resource quotas need to be increased manually. To do this, refer to the [Quotas and System Limits documentation](https://docs.cloud.google.com/docs/quotas/view-manage) and navigate to **IAM & Admin > Quotas**. After adjusting the quotas, delete the failed deployment and deploy a new one.